At this point we all know that the Raider’s offense ran a fairly WCO-ish scheme, with LOTS of ball going to the RB/FB out of the backfield. We’ll look at some common short/intermediate route concepts the offense utilized last year, as well as their base running game (IZ/OZ, power, and the counter), but today I want to breakdown my favorite vertical concepts the switch combo. I choose this particular play for two reasons: I’m a switch route fan boi and the play design is very clever as all 4 routes work together to achieve multiple goals against multiple defensive shells. Not a single route is “wasted”.
![]()
First, read this article by the always excellent Chris Brown at SmartFootball.com
The gist of the article:
1. “The Switch” is a June Jones/Run-n-Shoot staple, although the play has permeated through the NFL, college, and high school ranks. Notable NFL teams that run the switch combo include the Broncos, Packers, and Eagles. Oregon runs several phenomenal versions of the switch out of both a 2X2 and 3X1 formations. Again, read this article by James Light.
2. Switch routes are VERY flexible. In the original Run-n-Shoot version they are tagged as option routes, meaning they can be used to beat any coverage shell. Man-hi, Cover 2, Cover 3, Quarters, whatever; the route options allow both WR’s to attack the holes in each coverage. With that said, in order to run a “pure” version of the concept, LOTS of film room and practice reps are needed as both WR’s and the QB must make the same read.
3. Switch routes can be dressed up with a 3rd WR running a variety of short, intermediate, or vertical routes, although the two most common additions you will see are a flat route or a vertical.
4. Switch routes are VERY effective verse man as the switch action creates a natural rub between the trailing defenders. It is difficult for a defense to check into a “banjo” (“if the WR’s cross, we switch responsibilities”) call as switch routes are run from normal splits between the #1 and #2 WR. There is simply too much distance for the defenders to cover in order to pass off the WR’s effectively.
5. Switch routes can be converted to a variety of common 2-man route combos after the “switch” has occurred including smash, curl/pivot, all hitches, post/wheel, and “Pin” (post/dig). It’s easy to “show” the switch concept, get both defenders on heels as they prepare to defend vertical routes, and then run something short/intermediate in the vacated ares. In addition, the threat of converting the switch to a variety of route combos “protects” the base play by forcing a D to stay honest if they attempt to bail downfield early.
On to the play….
![Switch]()
Presnap….
![]()
-The down/distance is 3rd and 7. The Raiders are pinned fairly deep in their own territory. It’s important to note that this is the first possesion of the game, which IMO influences the play call. I think it’s a fair statement to say that most OC’s are less risk-averse early in a 0-0 ballgame.
-The offense is in a trey alignment (1 TE on the LOS and 2 WR’s to the strongside) with the RB splitting the weakside C and G. This isn’t a “true” wing alignment, but I’m going to call it that anyways.
-From the D’s perspective, 3rd and medium/long is a great blitzing down. Force a quick throw to the hot WR, rally to the ball to limit YAC, and make the tackle short of the sticks. As you can see from the image, the D has 6 players in the box, with 2 inverts that can easily slide inside as well. With only two defenders in a 3-point stance, the pressure can come from either side and any gap. The defense will do their best to disguise the blitz concept and coverage shell behind it until the ball is snapped. .
-The offense knows that this is a blitzing down/distance. They will also have tendency data to confirm what the defense likes to do in this spot based on the spot, down, distance, hash, and formation. My guess is the offense knows that a blitz is coming, meaning the offense will need to play a 3-deep, 3-under zone or Cover 1 (man). To continue the game of checkers, they probably know the defense expects them to dial up a quick-hitting play as both sides of the ball know a blitz is likely.
-The offense makes the final move of this game of checkers by dialing up a vertical route concept, betting that their protection can hold up. Based on reasons I’ll get into later I’m surmising that the strongside #1 WR is the intended target from the get go.
-A few notes on the DB’s alignments:
The field CB is playing with a slight inside shade. Because the WR’s split is so wide (2 yards above the #’s) the CB will use the sideline to “pin” the WR if he breaks outside. If the WR breaks inside, he will be forced to cross the DB’s face, which will create an opportunity for a jam and require the DB to cover less distance to stay “in phase”.
The boundary CB is aligned with a slight outside shade. Because the X WR’s split is fairly tight to the core of the formation, the CB cannot rely on the sidelines for help. Instead he will force the WR inside towards his help, the MOF S.
The Routes…
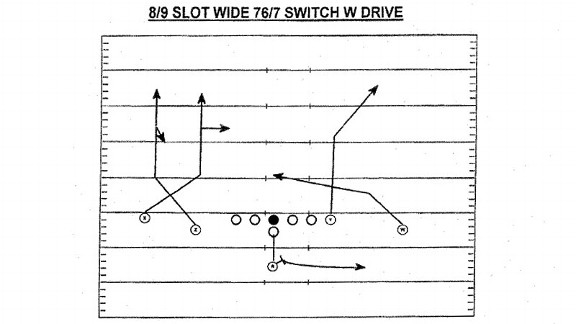
![]()
-My drawing is awful, but you should get the gist of the switch routes. The #2 WR should run a wheel route, breaking of the butt of the #1 WR at 4-5 yards. Like mesh, the WR’s must cross as close as possible to maximize the rub action. This preciseness takes time and reps to perfect. Again, the goal is to rub the defenders as they cross each other, creating separation for one or both WR’s.
-The TE’s will run what looks like an innocent angled route through both seams. This is the type of creativity I love to see in pass concepts. The TE must cross the FS’s line of sight in order to take his focus away from the real danger, the switch routes. Clever use of a decoy to ensure that the DB’s deep help is taking out of the play.
-The X WR will run a shallow cross to the area vacated by the switch routes. This route will act as the “hot route” should the blitz get home. As the X WR does not know who will defend him at this point he must be prepared to work through a collision from a LB, as he will likely be “walled off” within 5 yards of the LOS. In addition, the X WR must identify the coverage shell as man or zone ASAP. He will sit in the first hole he finds against zone and continue running across the formation verse man. Even if the switch routes are covered effectively, he will have ALOT of room to make a catch verse man if he can make it across the C’s face, as that entire area of the field will be vacated.
-The RB is part of the pass protection scheme. As the offense expects a blitz with likely stunts, the OL looks to be in a zone protection: The LT is responsible for the BS (backside) C-gap, the LG is responsible for the BS B-gap, the RB/Wing is responsible for the BS A-gap, the C is responsible for the FS (frontside) A-gap, the RG is responsible for the FS B-gap, and the RT is responsible for the FS C-gap. This zone pass protection will account for 6 rushers, or allow help if the D brings 5.
It’s important to note that the defense’s choice of personnel likely determined the protection call here. Although it is difficult to see from the image, the defense is showing double A-gap pressure with 2 LB’s. Teams do not like to protect the interior by design with RB’s against DLmen. Instead, they will use a Big-on-Big, slide, or half-slide protection scheme to ensure that OLmen block DLmen, and RB/FB’s block LB’s and DB’s.
Safety Rotation….
![]()
-The deep MOF S is “creeping” towards the LOS. This is an immediate heads up to the QB that the defense is playing games with their coverage shell to bring extra pressure. If the deep S continues to creep, the only players that can replace him in the MOF are the invert on the right-side of the D’s formation or the CB. If no one replaces, he is looking at Cover 0 with up to 6 defender coming.
Tipping the Coverage
![]()
-Two important things of note here.
First, the NB over the #2 WR has taking a step inside and is in position to attack the strongside C-gap. The #2 WR immediately notices the shift and gestures towards the NB. He is calling out an alert/check to the QB as well.
Second, the weakside S has opened his shoulders towards the middle of the field and is rotating deep.
This tells the QB two things:
1.) The defense is likely playing a MOFC (Middle of the field closed) look like Cover 1 or Cover 3
2.) The strongside S most likely has the #2 WR, indicating man coverage (There are a few more minor indicators that this isn’t a zone defense at this point, but t I don’t feel like typing them out). So, MOFC and man=Man-hi.
The Snap…
![]()
-The D is indeed blitzing, bring 5 rushers.
-The weakside S continues to bail towards the MOF, indicating man-hi. This *could* also be a Cover 0 variation (no deep help) with the S robbing the weakside seam/hook, but I would expect the D to bring a 6th rusher if that were the case. If you do not get to the QB QUICKLY in Cover 0 very bad things will happen. I’m not privy to the play, so I can’t say anything definitive.
-To the strongside I’ve used an “M” to mark man v. man match ups with WR #1, #2, and #3 (the TE).
-To be honest I am not quite sure what the boundary CB and MIKE are doing here. The CB remains flat-footed through the X WR’s break, but I don’t think he is flat-foot reading through the 3-step route tree (read the QB to break on any 3 step drop routes like a slant, then pick up the WR if the QB continues to a 5-step drop). There are a few option here; I’m can’t decide which one is most likely:
1. Initially MIKE has the RB and the CB has the X WR in straight man. When the RB stays in to block, the weakside coverage converts to some form of inverted Cover 2 where the MIKE takes a curl/flat drop and the CB plays overtop
2. The CB was playing a flat-footed read technique, but released the X WR when he immediately stemmed inside on the shallow route. The CB now has the weakside flat but maintains his depth as nothing is showing with the RB in to block. In this case, the MIKE will take the weakside hook/seam, although he makes no attempt to “wall off” the crosser.
3. Busted coverage. Who made the mistake? No idea….
-The weakside S continues to rotate deep. Notice that he keeps his eyes on the QB and attempts to keep his shoulders as square as possible to the LOS. Not an easy task and frankly, I think he waited too long on the drop if this is Cover 1. There is no way he is getting depth on anything vertical; his drop his simply too slow.
-With a S covering the #2 WR, the switch combo just got MUCH more attractive. The D has put the S in a position in which he must use his feet and hips to transition with the #2 WR when he turns his wheel upfield. In addition, he must navigate the rub coming his way.
Setting Up the Rub…
![]()
-Focus on the switch route at the bottom of the screen. The #2 WR is preparing to cross the butt of #1 and wheel upfield. Ideally the “switch” would happen a little bit closer, but I’m nitpicking. You can see the CB headed straight at the S. Also notice the large area of field that will be vacated for the crossing route as the WR’s continue their routes downfield.
-Next get eyes on the TE. He is almost across the S’s face. In fact, he has drawn the attention of his defender, the deep safety, AND the boundary CB. I still don’t know what the D was trying to accomplish by their coverage shell to the backside.
-Rather than walling the shallow, the LB inexplicably has turned his head towards away from the WR, thereby allowing a free pass across the field. He might have been expecting a seam/hook player to the field side to pick up the crosser, but again, i don’t know.
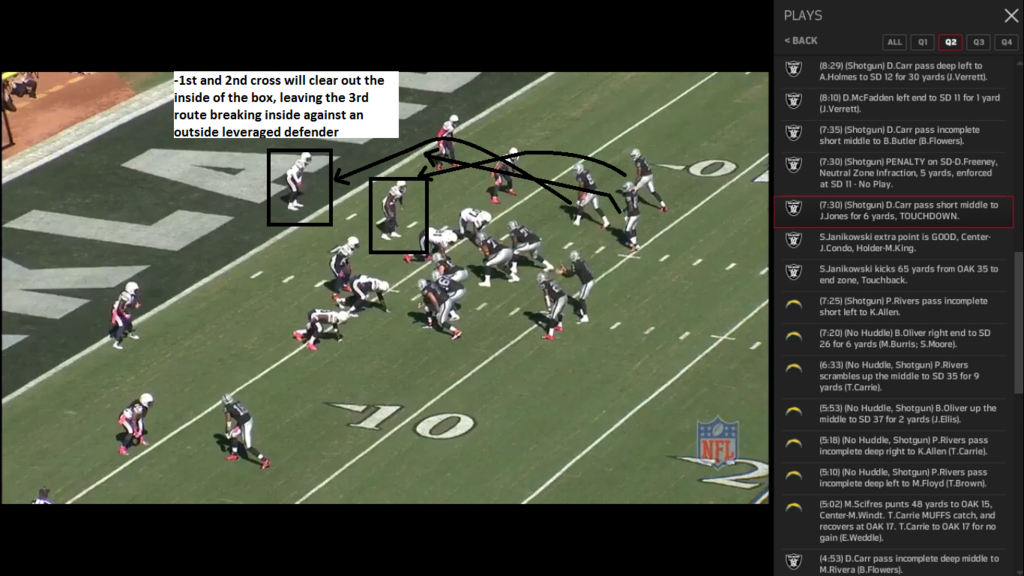
Rubs and Reads….
![]()
Note: I erroneously marked “Z shallow” instead of “X shallow” in the image.
-At the bottom of the pic, notice the defenders on a collision course. This is EXACTLY what the switch concept is designed to create.
-For some reason the deep S has focused in on the shallow cross. He has broken the cardinal rule of playing Man-hi: DO NOT LET THE “MOST VERTICAL” ROUTE GET OVER TOP OF YOU! He likely sees the space vacated by the switch routes and the lack of a single pass defender in the area. He then decides to break on the “open” WR because a completion will result in a 1st down. Unfortunately this is “hero ball”. It is not his play to make, and by abandoning his deep responsibilities he allows both switch routes to get behind him. In his defense, most NFL S’s would not be able to get overtop of the vertical routes when dropping from the opposite side of the field. It’s simply too much distance to cover. If he was instructed to drop late in order to disguise the coverage I put this on the defensive coaches as they are asking him to cover that distance. He needs some depth pre-snap to get there. With all that said, if this is Cover 0 with a robber (I don’t think it is) then the S did nothing wrong.
Going Downfield….
![]()
-The defenders, specifically the CB, do a good job of avoiding the rub. He is still on the WR’s upfield shoulder and hip, allowing him to make a play on the ball.
-The deep S is breaking hard on the shallow route, although his initial drop would have made it very difficult to get overtop the switches. To repeat, I think he is looking at an uncovered underneath WR who will make a 1st down catch if the ball is thrown his way. In addtion the QB is looking towards the strongside of the field. The S may have read the QB as targeting the crossing route there, as both the switch combo and cross are in his line of site (another hallmark of clever route concept design).
-Ignore my note up top as I am still unsure about the boundary CB and LB’s coverage responsibilities.
Ball Out…
![]()
– The ball is out at this point. I believe the original outside WR (#2 now as the switch has occurred) was the target on this play, with the shallow as a checkdown. Why?
Notice the new #1 WR cut off his route at the sideline. He had separation on his man and the throwing window to the deep out is fairly tight. Why cut off the route and not continue pressing the route vertical? Teh spacing between the #1 and #2 WR is excellent; neither defender will be able to come off his man and make a play on the ball. In addition, although you can’t see it in the image, his body language after the stem indicated that he did not expect the ball (He immediately turned his head towards the downfield towards the second vertical route).
-The QB did not wait for #2 WR to stem his route upfield before releasing the ball. He knows the S is out of the picture so he is anticipating at worst a 1 v 1 matchup if the CB stay in phase. This is an easy read for an NFL QB when the deep S breaks on an underneath route, although I think Carr knew the S would not be able to influence the switch routes because the drop was so late.
-The targeted WR stems his route beautifully upfield, although the image does not capture it. Very explosive, sudden cut that creates the separation you will see in the next image.
-Still no idea what the weak side LB is doing aside from covering the s##t out of some grass.
The Catch…
![]()
-Great throw by the QB and great job of catching with the hands by the WR.
The TD….
![]()